blog design

Thursday, August 25, 2011

Saw Blades + Mirrors = Smirades?!

       One day, I was skyping with Ryan and he informed of a new show on lifetime that apparently was specifically made for me. He was referring to Picker Sisters, its a show, where two designers travel across the county in the search for 'junk' that they can transform into other objects, for example, two fenders placed together can make a coffee table.   > google.the.show.trust.me.you.won't.regret.it.< Here are a few photos of their creations. Do you see that hanging chair?! Epic... Don't even get me started on the awesomeness of the rope chandelier!
Picker Sisters PhotosPicker Sisters Photos

Onto the Smirades :):
  Anyway, the other day I was out garage sale-ing with my mom, and came across 3 rusty saw blades. At first, I just loved the look of the them, and the price, which was $.50 for all three. It was one of those moments where I just bought them because I loved them, not because they had a purpose. Then I had a Picker Sister moment, the blades suddenly became small sunburst mirrors. At worst, I would be out $.50 for the blades, and $9.00 for the 3 mirrors. So, without further adieu here is how i created the 3 mini sunburst mirrors, I used 3 saw blades, 3 mirrors, and Aleene's original tacky glue.


Thursday, August 18, 2011

Corner Shelf

Ryan and I recently celebrated our 4 year anniversary, and I had one thing in mind that I wanted for my present. I have been eyeing the corner above our (way.too.large.in.my.opinion.) TV. I decided that it would look awesome if we added a corner shelf above the TV. So, at my request Ryan made a corner shelf, have I mentioned that I love that man, anyways the shelf is pretty rad in my opinion. Here are the steps and supplies 
that we used :

Ryan made the shelf out of the same reclaimed wood that he made the coffee table out of. We purchased brackets, and screws that came with anchors. The cost of the materials was around $5.00. 


 I really like the way the shelf looks in the corner. We eventually want to mount the TV just below the shelf, and then build a corner table or storage bench below the TV.


*p.s.* the two dirt spots are driving me crazy, I didn't know they were there until I took all of the images.

Tuesday, August 16, 2011

Another Attempt at Root Beer

Enough is Enough! Us Knox's have been known to get recipes wrong in the past. First it was the alfredo sauce of '09, then it was the vodka sauce experiment of '10, and finally the root beer venture of '11. The first two may have knocked us down but it obviously made us stronger! So, we are back at it for one more attempt!

Last Attempt Preparations
How do we know it is the last attempt you ask? Well, we know there are a lot of factors that could cause us to not like the previous attempts. However, to make Root Beer you really only need 4 ingredients. You need Water, Extract, Sugar, and Yeast/Dry Ice (explain later). I know the water and sugar isn't the issue so we either don't like the taste of the extract or the ale yeast.
So, here is our last attempt:

First:
1 Gallon water, 3 tbs. Extract (more than recommended because previous recipes have been watered down), 3 cups of sugar ( I put in 1 cup of sugar for every tbs. of extract!), and finally 1/4 tsp of yeast (the least amount we can put in and hope that it carbonates!).


We also thought that we may not like the taste of the "ale yeast" because it is made for beer. So, I bought a 3 pack of yeast packets (enough for roughly 20 gallons of root beer by most recipes and I wouldn't even use that much!) for $.99 at Meijer. It is baking yeast so we are hoping it won't have much of a taste.


Second:
2 Tbs. Extract (All I have left), 2 cups of Cane Sugar (to match the extract), 3/4 gallon water (We kept adding water until it tasted right!)

Once we tasted it and saw that it tasted good (telling us that we do in fact like the extract) we decided to add a few other ingredients. So, we added 1/2 tsp of vanilla, and 1 tbs. of real maple syrup. This added a fuller/thicker taste that we didn't have with the regular extract.

Now for the Carbonation! This is dangerous so make sure you have all the correct protection and equipment before you try this!

We were surprised to find that Meijer sells dry ice up front next to their Ice Machine! It was $8 but you get a lot! I would estimate that for $8 you get enough to do 10+ gallons of Root Beer.

So, here is how it works. You need a container for your root beer that you can put a hole in the top. It just so happens that britt and I have this old water jug that has a top with a hole! You will probably want to do this outside and keep the kids (or puppies) away from this part.

Spread out a sheet, towel, or rags so that you can clean up your mess afterwards. With gloves, long sleeves, long pants, shoes, and goggles (I should have been wearing these!) break off a chunk of dry ice. A good estimate is 1 lbs for every gallon but you will see later that less than that is plenty!
In a towel, break up the dry ice enough so that you can put it in the container with the Root Beer. I found that it worked better to put a nice big chunk in if you can. This big chunk freezes to the bottom and seemingly does the majority of the work. You will begin to see it react. Next, you are going to want to carefully put on your lid. You should see big bubbles from your large piece at the bottom and it should "smoke" a lot.

We waited about 30 minutes and came back because it is a small batch. You are going to want to wait longer if you have a larger batch. Wait until the smoke is just rising off the drink and not pouring out anymore.

Pour the new carbonated (bubbly) liquid into its final storage container, make sure you don't get any dry ice in this! We have our trusty automotive funnel with a filter so it helps with this. You should see your big chunk at the bottom of the container and you can knock that out. If it doesn't all come out you can rinse it out with warm water and it should be clear.

Now try your new carbonated root beer for taste! I recommend putting it in smaller containers (see our ez lid bottles) and letting it sit for 24 hours before a full serving, although this is not required or needed!

So we did it! We finally have found the issue (the yeast we were using). We will try the other batch with the other root beer later to see if it tastes good. I am assuming we will move to strictly dry ice carbonation!

Friday, August 12, 2011

Pinterest

Well, I am going to jump on the blog-about-pinterest band wagon. I have attempted to get many of my friends pinning, but couldn't fully explain, in just words what exactly pinterest is. So, I figured I would write/show photographs about it. But, before I get started on that I would like to take the description of Pinterest directly from their website. " Pinterest is a Virtual Pinboard. Pinterest lets you organize and share all the beautiful things you find on the web. People use pinboards to plan their weddings, decorate their homes, and organize their favorite recipes.Best of all, you can browse pinboards created by other people. Browsing pinboards is a fun way to discover new things and get inspiration from people who share your interests. To get started, request an invite." So, in an attempt to let it speak for itself, here are a few epic things that I have found browsing pinterest. 
                                                  via
                                             via
                                                            via
                                                            via
                                                         via
                                                                     via
                                                        via
So, proceed to pick your chin up off the floor :) and email me for an invitation so you can start pinning immediately. 

Thursday, August 11, 2011

Second Attempt at Root Beer

"Homemade" Root Beer!

Well, the first attempt at Root Beer did not go so well.  I don't know how you guys take failure but in Fort Knox there must be vengeance, or at least another attempt!

I noticed I didn't give any credit to where I got the recipe, materials, and any other info.  Here is a list of what I used and where we got it!

The 1st Attempt Materials

Recipe Inspiration
*The technique and recipe was inspired by the link below, not copied, that is probably why it didn't taste good!*
http://biology.clc.uc.edu/fankhauser/cheese/rootbeer_jn0.htm


Extract:
I did some research on the extract.  I thought at first that I would make it from scratch but because of my lack of baking skills and the weird ingredients you have to find to make it from scratch I decided to go the extract route.  I was recommended this website by a home brew website.  I bought the "gourmet" extract because of the example that they gave of the taste.  They have 3 very different extracts so choose based on your preference:
http://homemadesodacompany.com/rootbeer3.aspx
As you can see I paid $7 for it and it smells exactly like what I wanted!  It will make up to 5 gallons so you can do the math if it is a good deal or not.  Finding the right extract is the most important thing when making your home brew because it is what is delivering the overall taste.
Ale Yeast:
I was recommended by different sites to use Ale Yeast instead of regular yeast to I bought this yeast:
http://homemadesodacompany.com/coopersaustralianaleyeast15gr.aspx
It seems like it makes sense but I will tell you later why it may have been a mistake.
Maple Syrup: A friend gave me a bottle that his dad bottled in Vermont.  For more information or if you would like to purchase some of this syrup let us know.
Vanilla: This is a Meijer brand vanilla.  We have pure vanilla but I chose to use Meijer brand because I like the way it smelled better than the real stuff
Brown Sugar: Basic brown sugar from Meijer
Cane Sugar: This was important to me to use Cane sugar because it is what all the major brewers use.
Molasses:  We got this at Kroger.  This is an ingredient that is used in a lot of root beers but it smelled awful in my opinion!
Honey: We used some real honey that britt had from a wedding that she photographed.

Containers: Water jugs from Kroger and eventually glass "EZ Cap" containers from Ikea!
http://www.ikea.com/us/en/catalog/products/40065867#/10082806/

So, The above ingredients did not work!

Here is why I think they didn't work:

First, the honey, and molasses were eliminated from the next batch because they gave it a weird taste.  The molasses gave it an awful smell (even though i only used 1/8 cup) and the honey didn't work well with everything else.  Second, I put in too much ale yeast (because of "miscalculation) and it fermented too quickly (don't trust the yahoo or google answers when baking!).  This created an overwhelming alcohol taste.  Also, the ingredients didn't work well together at all.  They all stuck out like sore thumbs.  My theory was like trying to take a whole bunch of colored crayons and melt them together expecting them to make a rainbow when in reality they just make a brown blob!

In theory. the extract, water, sugar, and yeast alone should task good so I thought adding a lot of the extra ingredients that I like in my favorite brews would only make it better! This did not turn out to be right!

The Second Attempt!

So, the second attempt we did 1 and 1/4 cup of cane sugar, 1/8 cup of brown sugar, and 1/2 tsp yeast to start the batch (backward compared to how I did it last time)!  The yeast started to work with the sugar as soon as I put it in.  I then shook everything together trying to spread out the yeast evenly.  Next, I added 2 tbs of the extract, and 2 tbs. of the vanilla mixing it in with the sugar. To mix everything together, I put in half my water and stirred it up.  Finally I put in 1/4 cup of maple syrup as an extra sweetener.  Britt and I then used our automotive funnel with the filter to poor the mix into the water jug from earlier.  The filter kept out any large particles and made the drink clear.  I screwed on the top so it could ferment and put it in our guest bedroom (warmest room in the house- 75 degrees or so) overnight.  We will see how it tastes tomorrow!


Update:  
Britt let me know this morning that the water jug had expanded and was tight (which tells us that it is done).  She poured it through our automotive funnel again to filter out any remaining particles.  Once she gets it into the fridge in our nice glass containers from ikea it will stop fermenting and cool down.  I will try it tonight to let you know!

Solutions if it still sucks!
If the taste is still not where I want it to be I will make one more batch using only extract, water, sugar, and yeast.  If the overall taste sucks then I know the extract is not what I am looking for.  If it still tastes good but still "alcoholly" I will replace the ale yeast with a typical baking yeast.  I don't know why that would matter but it is a thought.  If that doesn't work I will move to one of the undesirable fast methods of carbonation.  That will be for another day!

Awesome News Update!
We were able to find brown glass bottle with something called a "EZ Lid" online for $1 for a 16 oz bottle. I bought 6 16 oz bottles and 2 32 oz bottles for $18 with shipping!
http://www.midwestsupplies.com/ez-cap-bottle-special-16-oz.html
http://www.midwestsupplies.com/ez-cap-bottle-special-1-liter.html


Tuesday, August 9, 2011

Reclaimed Wood Coffee Table

When we got our current couch we didn't have a coffee table to go with it. I had a really hard time trying to find a coffee table that would be long enough, within our budget, and in the style that I wanted. So, I came up with the idea to use the scrap wood that had been sitting outside for a few years. I attempted to build the table myself, but I didn't feel confident enough to complete it, so I had Ryan do a majority of the cuts/drilling, and I stained, applied polyurethane, and painted the table. Unfortunately, I do not have photographs of the process, but I do have photographs of the final results.
 Ryan screwed the boards together with these flat brackets:
 This box came from our garage, I believe the old owner used it as a tool box of sorts.

I painted the legs the color of the dining room walls, because I like two toned furniture pieces. If you have any questions feel free to ask! :)

Lighting

Continuing on with our lighting adventures, Ryan and I also decided to update the lighting in the dining room. We started with builder grade lighting:
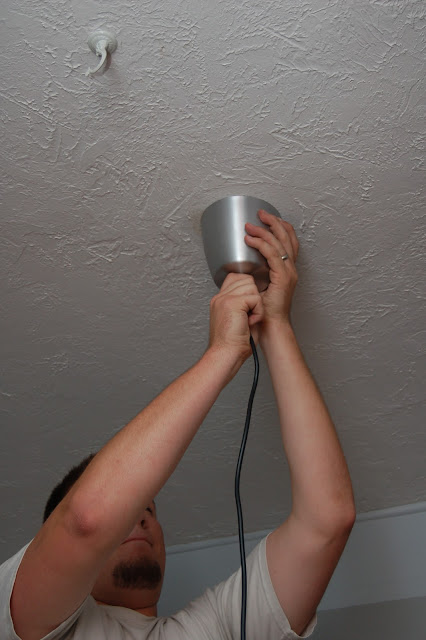
Well, It wasn't exactly the same as when we moved in ( I removed the glass cups surrounding the light bulbs in a desperate move of needing the light changed in some way). We once again chose the Foto light from Ikea , or as Ryan calls it the 'jumbotron'. We first began by uninstalling the original fixture:


 Due to the old wiring in our house I am omitting how exactly we wired the fixture into our ceiling. No worries, it was safe. Here is the wire portion of the new fixture hanging from the spot in the ceiling:


 Here she is, I really love her. I am still unsure of how to handle the wire hanging wonky, but I'm scheming something with rope ;)


Monday, August 8, 2011

Root Beer Making

Ryan has a mild obsession (as I'd like to call it) with root beer. He tends to become interested in something and then he needs to gain as much knowledge as he can about that subject. His subject of the moment is Root Beer. Tonight, he decided he needed to make his own root beer. Here are a few pictures from his root beer adventure:
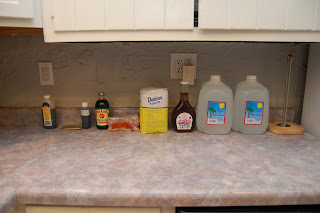
Ingredients: Vanilla, Molasses, Pure Honey, Maple Syrup, Cane Sugar, Water, Root Beer Extract


Here is the root beer waiting to receive the yeast. (yeast causes carbonation)

the proud creator:


                                          We will let you know how it tastes in a couple days :)
** update** the first batch that we made fermented for far too long and unfortunately the soda turned slightly into alcohol. Ryan is making a new batch tonight.